


You know the old saying: “Don’t judge a book by its cover.” Well, the same should apply for blogs: “Don’t’ judge a blog by its design.” Right? I wish, but that’s so NOT true!
I want to connect with my readers with personal and engaging content; however, I felt like my crappy blog design was a huge barrier. So I hired a designer Aileen Barker to help me with blog make-over. We started with the mood board as the foundation of the overall blog design, which helped the designer to get inside my head for how I wanted my blog to look and feel.
There were a lot of iterations of revisions during the design process. (Sorry, I hope she doesn’t want to kill me!) I will say she was patient and professional – she listened to my feedback and it came back with an updated designs that were even better than I imagined! This was my first time going through this process and if I knew where to start and key elements of the mood board, it would have gone a bit more smoothly.
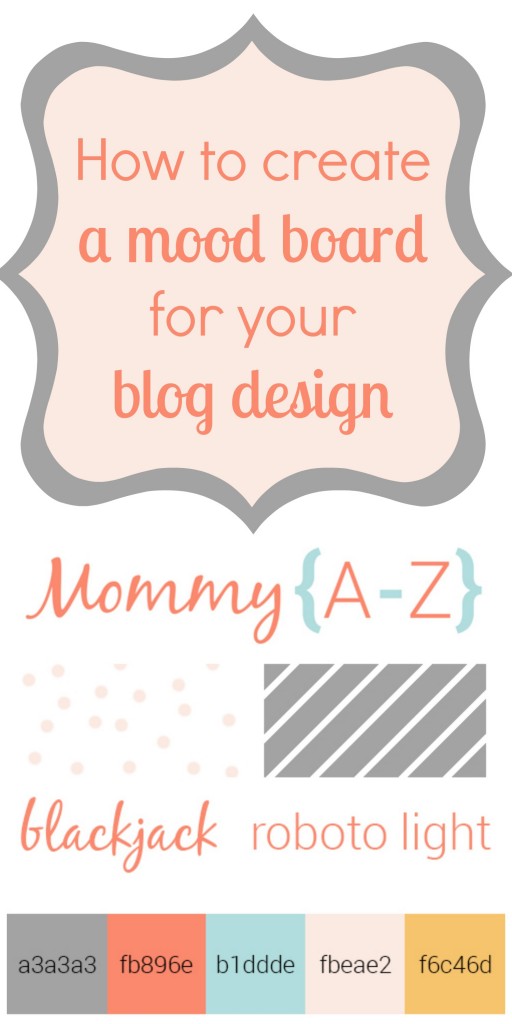
Here’s what I learned and how I did it. Hope it helps you in creating a mood board for your upcoming blog makeover:
1. Choose a Color Palette
What colors make you happy? What shades or tones do you want to express through your blog?
My favorite color is grey and lately I’ve been gravitating towards the color combo of teal and coral. It’s everywhere – on my nails, my outfits, my home decor. So I knew I wanted those 2 as my primary colors with grey as the main supporting color.
Once you figure out the main colors, you can use designseeds.com to find a complete palette. There’s so much inspiration on that site, so I just started pinning all the palettes that appealed to me at first glance. Then, I went through the process of elimination by looking closely at the secondary colors that I didn’t love 100%.
Here were the final two palettes:
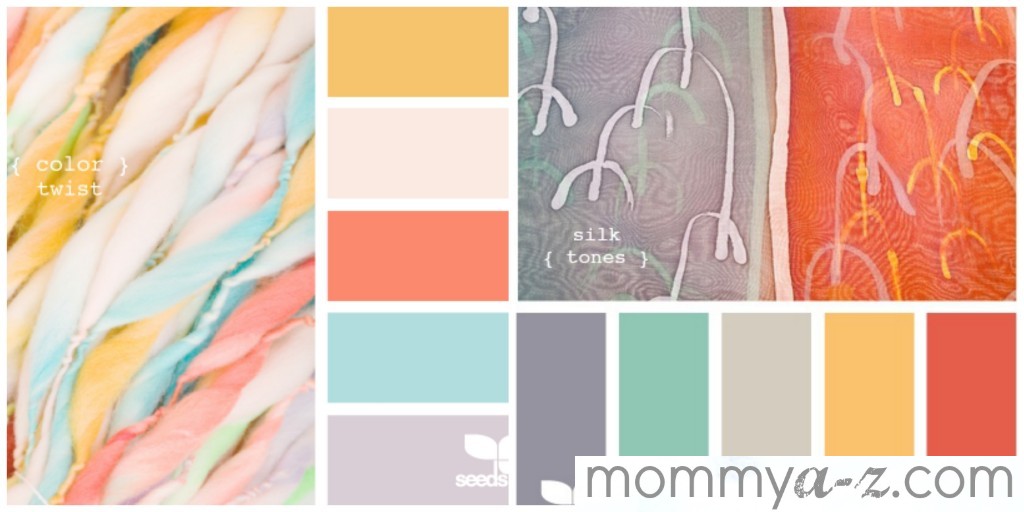
www.designseeds.com
I made myself dizzy from trying to pick which one I liked better because they were so close. I ended up going with “color twist” because it reminded me of sorbet: fresh and light. Then, the designer pointed out that the bottom color was more of a light purple, so we took the grey from “silk tones.”
NOTE: After going live with the new design, I debated over the color palette I chose – is it too dull? See the alternate choices here and let me know what you think! I’m going to keep this one for a few months before I decide whether I want to change it up again.
2. Choose Your Fonts
The font can set the set tone of your blog to your readers just as loudly as a color palette can.
I was super picky on picking just the right fonts. I wanted it to be playful with a mix of a cursive font with a clean, sans-serif font. I used fontsquirrel.com because it was nicely organized and easy to browse through. It had a test drive feature so you can type in your blog name to preview how it would turn out.
I tested out how different fonts would look on the word “Mommy” and here were my top 3:
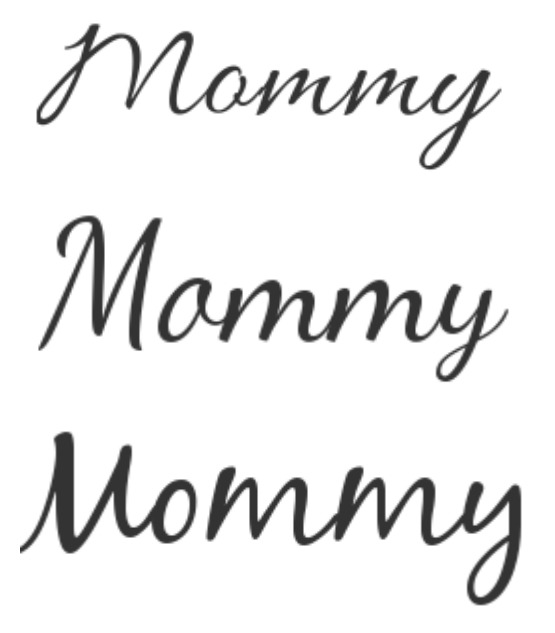
Top: Allura // Middle: Dancing Script // Bottom: Blackjack
This was also a tough decision, and the winner was Blackjack. It seemed a bit less formal than the other two and something about it reminded me of my own handwriting.
Then, designer chose Roboto for the clean simple font represented in the “A-Z”. Easy enough!
3. Add Texture
Texture can be the pattern in the background or any pattern that repeats along the header or sidebar.
I love, LOVE, L-O-V-E chevron. When I created and designed my own blog a year ago, that was the texture that I included in the background and header. Then, when I started getting acquainted with other blogs across the blogosphere, I realized that chevron was everywhere! Every time I went on a blog hop, got introduced to new blogs, and saw the same pattern – I would cringe and a part of me would die a little due to the lack of originality. So chevron was out.
When I think of texture, I think of scrap booking and fancy paper. Design House Digital offers a lot of digital scrap booking kits – even free ones that you can download. That’s where I got my un-original chevron background.
This time around, I used Pinterest and came across this mood board:

I really liked the clean look of the diagonal stripes. I like polka dots, but I thought the scattered dots on the bottom was a fun twist – it reminded me of confetti or twinkling stars! I’m hoping to incorporate this into the category titles or menu some day.
4. Design the Header
Once we had the colors, fonts, and textures, then the designer worked on the header. This is the first thing that the reader sees when viewing your blog, so it better be good! At minimum, it should include your blog name. This is also a good spot to put your logo or and a tagline if you’ve got one. Some people even add pictures or a caricature of themselves which is good, too; however, I wanted mine to be simple so I just stuck with my blog name.
My designer pulled it all together using the colors and fonts, and she even added the curly brackets around the {A-Z}. I liked it. I think it added a bit more weight to balance out the “Mommy” with the “A-Z”. Genius! That’s why she’s the professional designer – I would have never thought of doing that on my own! Since it was in the header, she incorporated the curly brackets into the rest of the blog design.
5. Put it All Together
Now you have all the ingredients to create a mood board for your blog design, re-design, makeover, overhaul, etc. The next part is when the designer takes those elements and works his or her magic to the rest of the blog design like the layout, social media buttons, sidebar image titles, and the social media buttons.
I hope this was helpful for you! Are you going through a blog re-design? I would love to see your mood board or hear your feedback on the design process!
Thanks for reading. Follow along on my Blog Design Pinterest Board for more inspiration and all things Blog Design!
xoxo // gracielle


This is great information! I know at some point my blog design will need to evolve and this is helpful advice. Pinning.
Michelle recently posted…Get Your Home and Life Organized! {Let’s Get Organized Link Party}
Ok, I am using Evernote to start compiling my blog redesign moodboard and had clicked your blog as an inspiration design, and this was the first post on here today! Coincidence?!?! I THINK NOT. 🙂
That’s crazy! Can’t wait to see your redesign! Thanks for stopping by 🙂
I’m thinking about going for a lighter and cleaner look on my blog soon so I can really use this information. Thanks for the resources.
Teresa recently posted…Spicy Tuna Salad
I am going through a blog re-design! And I’m getting crazy over checking sample pre-made templates, etc! Haha. It’s a tedious process but it should be worth it in the end. I’m also working on registering my own domain now, I need to do a lot of research. Hehe thanks for the tips here!
Rea recently posted…A Street Date!
OOH registering for your own domain! That’s a huge deal 🙂 good luck with that and your blog re-design! Let me know if you need some feedback or someone to bounce ideas off of!
Reading this one again to prepare for another blog design lol! Still great info.