


Happy Tuesday, friends! If you are wondering if things look a bit different around here, it’s because I did a little blog make-over just over the weekend! I did it all by myself!!! ….and I didn’t break anything (that I know of, yet.)
I liked the clean, simple layout of my previous blog design which is exactly what I asked for with my designer, but I after awhile I felt like the color needed a little UMPH and more pretty stuff. So there you have it: “UMPH” and “pretty stuff” – that’s why I had to do it myself because I’m terrible at articulating to a designer exactly what I really want. Hashtag, controlfreak. They were mostly cosmetic changes and no updates to the underlying theme or CSS, so I took a stab at doing it myself.
It wasn’t too hard and it was absolutely free thanks to online tools like Design Seeds (for color inspiration), Pic Monkey (for photo editing), Canva (for graphic design). All I needed was a little HTML know-how and a lot of patience for trial and error. Here’s what I changed and how I did it:
Mood Board
First, I started off with my mood board for inspiration. Click here for a tutorial on how to create a mood board.
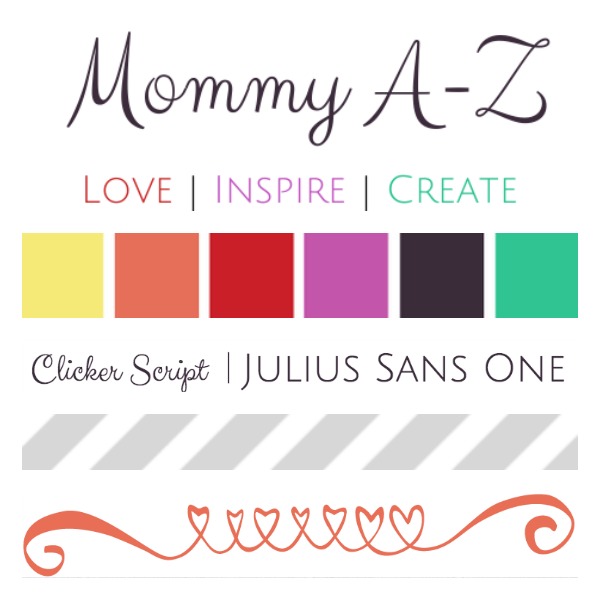
I think it’s a good idea to start with a clear vision on colors, fonts, and textures/patterns for the blog design. There were so many times that I wanted to add a pretty graphic here, or a frame there, or a funky font. It was important to stay true to the main design elements so that all the different elements of the blog made up a clean, cohesive look.
Header
I kept the design of my header simple and pretty. Using Canva, I just created a text box using the “clicker script” font and added a few pretty swirly hearts stickers to frame the text.

I also leveraged this design to create a nifty new button. Feel free to grab my BUTTon along the sidebar. Ha. Old joke, but it gets me every time!
Social Media Icons
Canva has free social media icons where you can customize the color using hex color codes, so I just set the colors to match the hex codes on my mood board. Huh? OK, let me take a step back. I got my color inspiration from Design Seeds. If you hover over the color palette, the hex code is displayed on the screen. Then in Canva, I selected a social media icon and customized the color by entering in the corresponding hex code. BOOM.


Here’s a quick tutorial on how to add customized social media icons to your blog courtesy of the SITS Girls: click here.
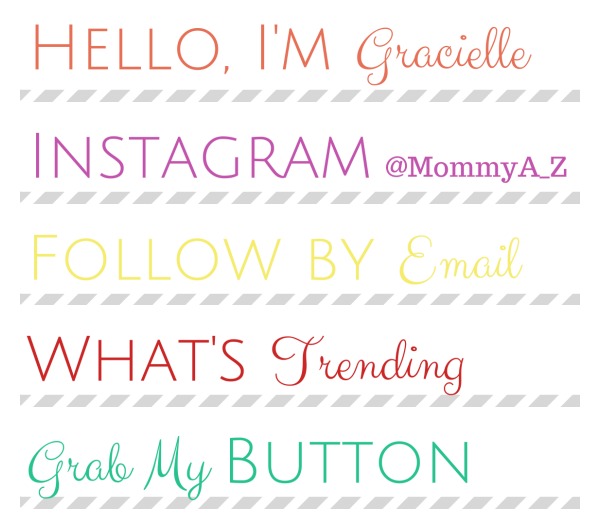
Custom Navigation Menu Using Images
This one was the trickiest one for me. I wanted the primary navigation menu items to have alternating fonts between “clicker script” and “julius sans one.” I think it adds visual interest to mix up the fonts, without cluttering the navigation menu:
![]()
I couldn’t figure out how to update the WordPress menu options to have alternating fonts without having to dig into the code. So I created the menu options using Canva and saved them as images. Then, I added a WordPress plug-in called “Nav Menu Images” to upload the images to the nav bar.
This part took forever. Even the plug-in was a bit tricky to figure out. So don’t click on those buttons yet because I’m not quite done creating those pages. (Everything is a work in progress, right?)
Sidebar Titles
Sidebars tend to get pretty cluttered, but it’s not so bad when the sidebar titles are clearly defined. Again, I used Canva to design the sidebar titles, using the mixed fonts, grey-striped texture, and colors from my mood board. To save time, I just duplicated the first one I created and used it as a template to create the rest.
Then, I applied these to my sidebar widget using this simple HTML code:
<img src=”http://imageurl.com” width=350 height=61>
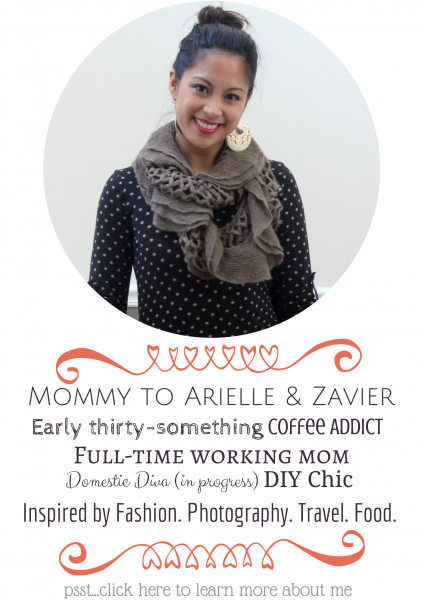
About Me Blurb
Using Canva (again) I was able to create a cute and sassy “About Me” blurb using a photo, text, and the swirly pink heart sticker from my mood board. I used the same HTML code structure as the social media buttons and add it to my sidebar.
So those were the 5 things I changed for a quick, free blog make-over this weekend. I’m still learning as I go, but the header, social media icons, menu, and sidebar titles were small changes that you can do, too, with a little time and patience.
Let me know what you think of the new look! Or let me know if you’d like me to go into more detail on how I created and applied any of the newly designed elements.
xoxo // gracielle.


I’m so glad you made it on your own Gracielle and I’m glad you finally got some time too! 🙂 I guess it is more fulfilling when we have control over our blog design. I’m loving the look over here and I like the fonts you used! All the best 🙂
Rea recently posted…It’s Officially Summer!
Thanks for the feedback 🙂 It felt pretty empowering to be able to design and implement on my own. Plus it was free!!
It looks AH-MAZING!! You are a rock star! Seriously! LOVE your social media buttons! :)-Ashley
Thanks, Ashley!! Glad I’m not the only one who gets excited over social media buttons 🙂 yaaaay!
looks great! and thanks for linking to your tools!
Roaen recently posted…Goodnight Nanny-Cam, A Parody Book [Giveaway]
Thanks and you’re welcome!
Lovely redesign! I’ve been itching to redesign my blog for a few days now and I’m thinking of taking the leap pretty soon. Great tips too! I might be using some of these in my redesign. I love design seeds, such good inspiration for colors there.
Tenns @ New Mama Diaries recently posted…Sleepless In Atlanta Pt.2
I’ve been wanting to change it up for awhile and inspiration just struck me and I was able to knock it out over the weekend! I hope you find some of my how-to’s helpful 🙂 let me know if you have any questions!
I love it! And I love using Canva. I’m really terrible at design, for some reasons. I can do photography at least, but man, my skills are lacking.
You did wonderfully. I know you have quite an eye for design, though.
Tamara recently posted…Science Fiction Double Feature.
I love it! (Though I was a big fan of your old design too) I love the colors you used! My more-stylish-than-I kids would totally agree lol
Herchel S recently posted…DIY Easter Wreath
Thanks, Herchel! I wanted the colors to be bright and fresh for spring and summer. Just wish the weather would cooperate here!
Wow – awesome!!! I pinned this because I want to try a few things and I’m pretty much worthless with this kind of thing!!
Kim recently posted…Are You the Same in “Real Life” as You Are Online?
Thanks, Kim! Hope you find it helpful when you get a chance to make your updates…Let me know if you have any questions!
These are great tips – I am going to change my social media icons now!! Love the design.
The social media icons were the easiest ones to change! Let me know how it goes 🙂
That is AWESOME you did this all yourself!! Looks so good!!
Shannon @Lady’s Little Loves recently posted…Our Spring Mantle and Decor
Thank you! I’m happy on how it turned out…it’s a work-in-progress, still a few more updates to make!
I totally love it! I’m bookmarking your page because I’ve been thinking that I need to refresh my blog. I love the sidebar titles, and I think I need some!
Ginny Marie recently posted…Staycation! {Spin Cycle}
Thanks, Ginny! Sidebar titles were relatively easy to make compared to the menu titles. Your current blog design makes me happy 🙂 So fresh and lively!!
It looks awesome! I don’t think that I would attempt to mess around with the menu titles, you are more talented than you give yourself credit for! My blog is all self-designed as well. Not too shabby for my first time, but I’m definitely going to take your advice on using the mood board to keep things consistent next time I switch it up.
Sarah @ Beauty School Dropout recently posted…One Community: April 2014
You did a great job! I’ve just recently heard of Canva but haven’t had time to explore it yet. My blog could definitely use a bit of sprucing up! So glad you shared how you changed your design.
Jeanne recently posted…A Sign Of Spring?
Canva does take a bit of time to get used to, compared to Pic Monkey which was relatively easy to figure out.
I am currently re-branding and doing everything for my blog from scratch. Your posts are saving my life (and my wallet) Thanks SO much for sharing!! I will definitely be giving you a shout out when my new blog comes up!
Glad you found this useful, Ginger! Can’t wait to see how it turns out 🙂